
Schedule and dispatch jobs
Book jobs, drag them to the right tech and time, tell customers about new times, and send techs out in the best order.
Free forever Not a trial. No card, no contract, unlimited users. Card payments cost 3.9% + 30¢. Our promise →
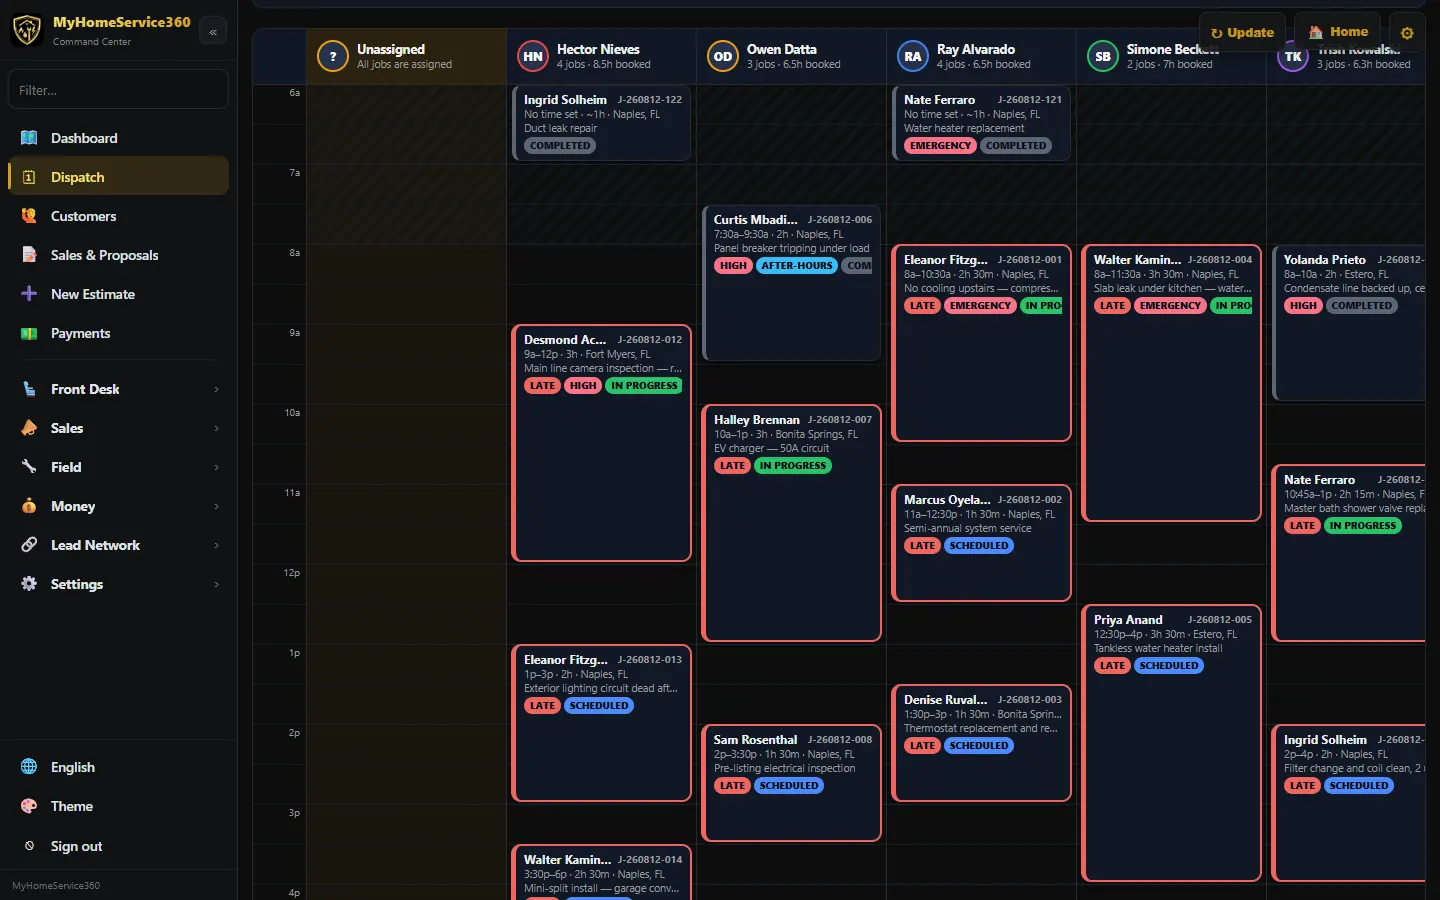
Step 1: Read the board
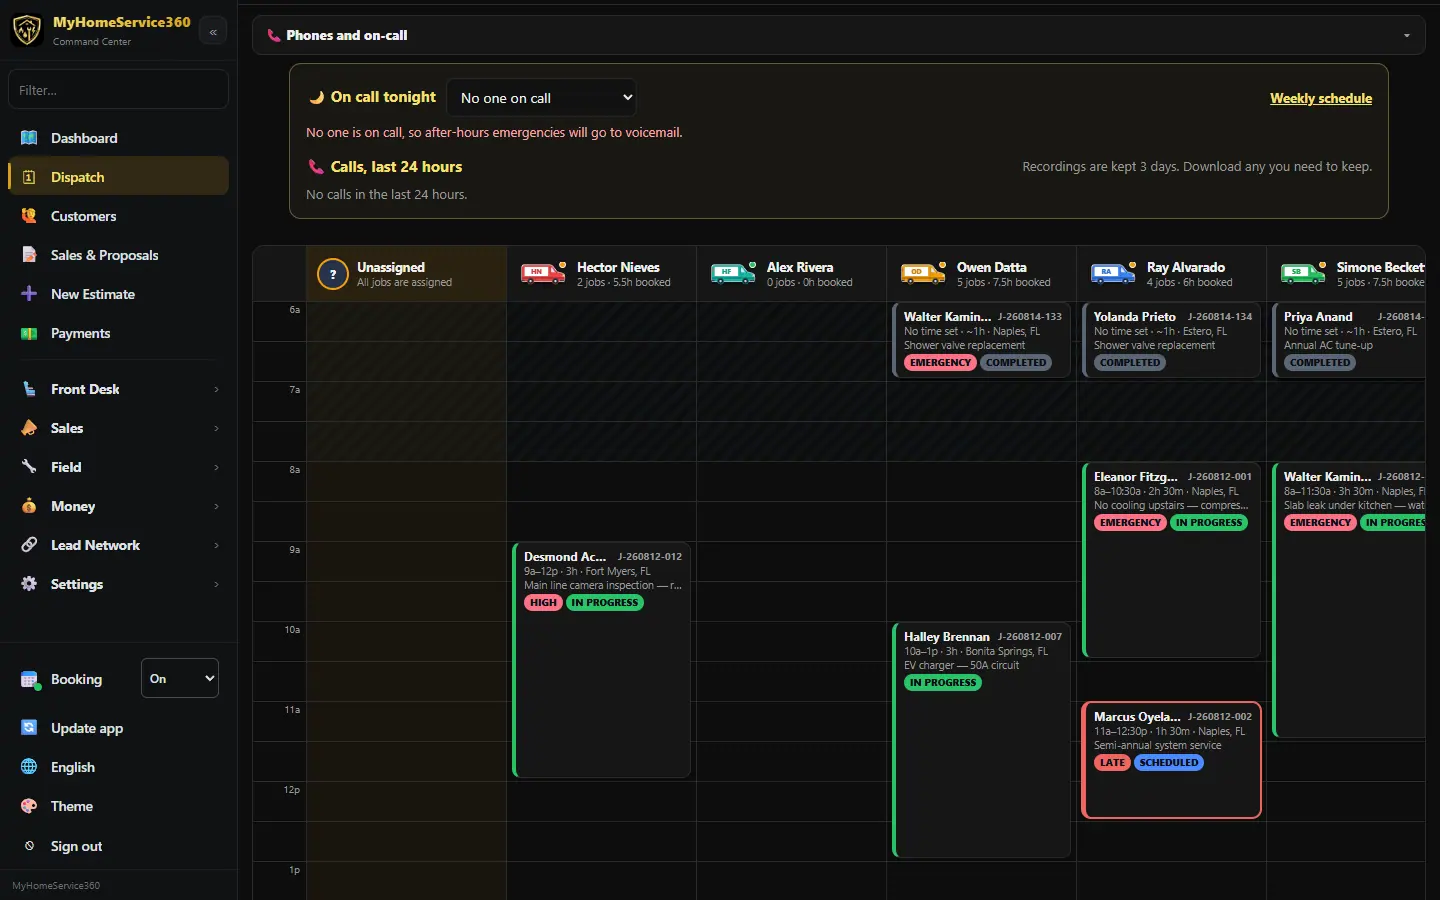
Open Dispatch. Switch between Day, Week, Month and List, and use the arrows or Today to move around. The filter chips show Unassigned, Late, In progress, Completed, Warranty / callback, After-hours and Emergency / high work, so problems find you.
Step 2: Book a job
Click an open slot in a tech’s column (or the Unassigned column), pick the customer, the job type and the time window, and save. Jobs also arrive from approved proposals, online booking and the AI receptionist.
Notes when you create it. The New Job form has Office notes (gate code, who to call, billing notes) and Notes for the tech (what they should know before they get there). They become the job’s first notes, signed with your name, and show on the job page and in the tech app’s Notes tab.
Step 3: Service call or Job / Project
Every new job starts with What is this?: 🔧 Service call (diagnose or repair, usually one visit) or 🏗 Job / Project (install, replace or multi-day work), or 🧰 Maintenance (tune-up, PM or a service-plan visit). Picking Project sets the job type to installation, Maintenance sets it to maintenance, and Service call sets it back to repair. Service-plan visits always count as Maintenance. Jobs from an accepted proposal come in as Projects, and calls from the phone or the AI receptionist come in as Service calls.
Each card on the board shows 🔧 Service, 🏗 Project or 🧰 Maintenance, and the Service calls, Jobs / projects and Maintenance chips filter the board. In Money → Job Costing → Reports, group by Service / project / maintenance to compare margins.
Step 4: Drag a job to another tech or time
In Day view, grab a job card and drop it in another tech’s column to reassign it, higher or lower to change the time, or on the Unassigned column to take it off everyone. A dashed outline shows where it will land. Times snap to 15 minutes and the job keeps its length. You can also open the job and pick a tech from the list.
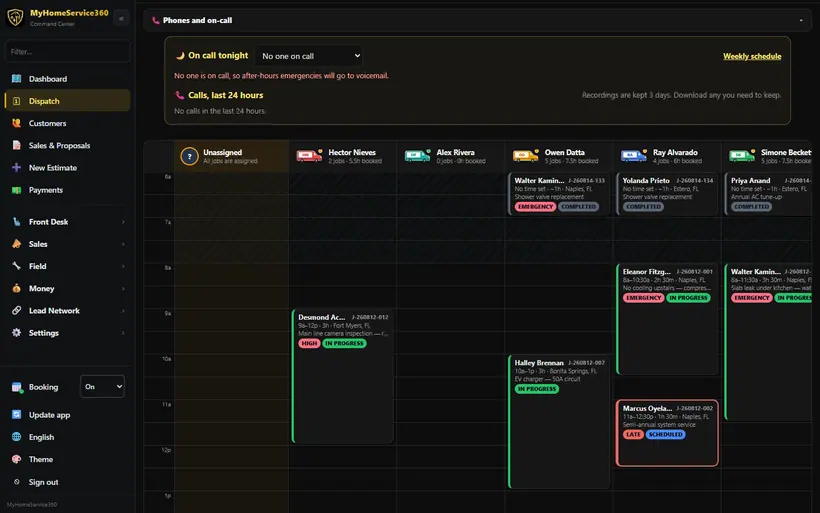
Real screen from the demo account; names and numbers are sample data. Step 5: Move jobs between days in week view
In Week view, drag a job to another day, another tech’s row, or both. The time of day stays the same.
Step 6: Move jobs on an iPad or phone
Press and hold a job card for about half a second until it lifts, then drag it where it goes and let go. A quick swipe still scrolls the board, so you won’t move a job by accident.
Step 7: Move without dragging
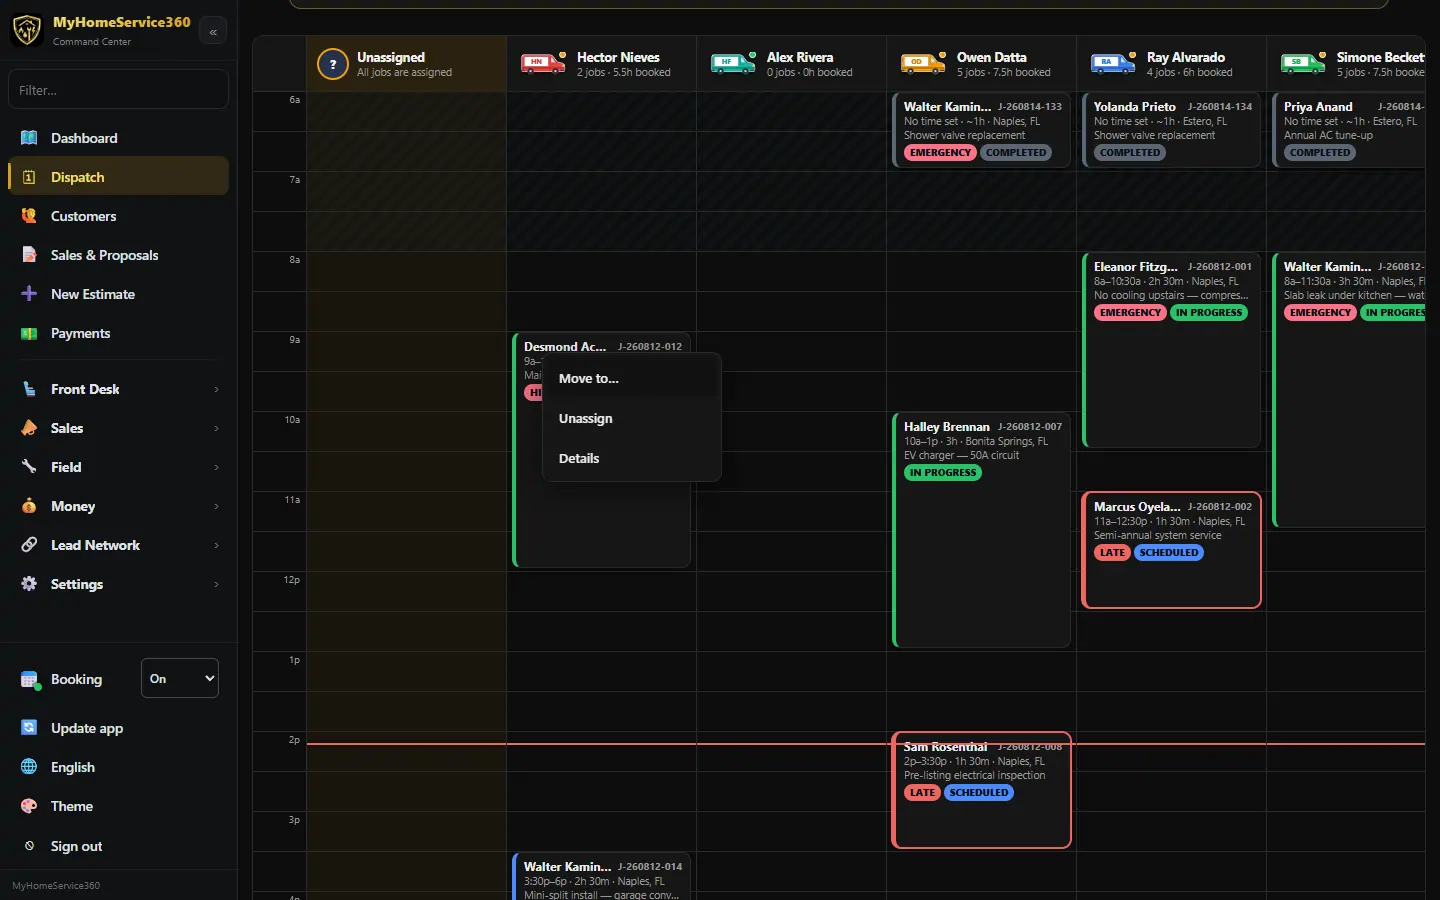
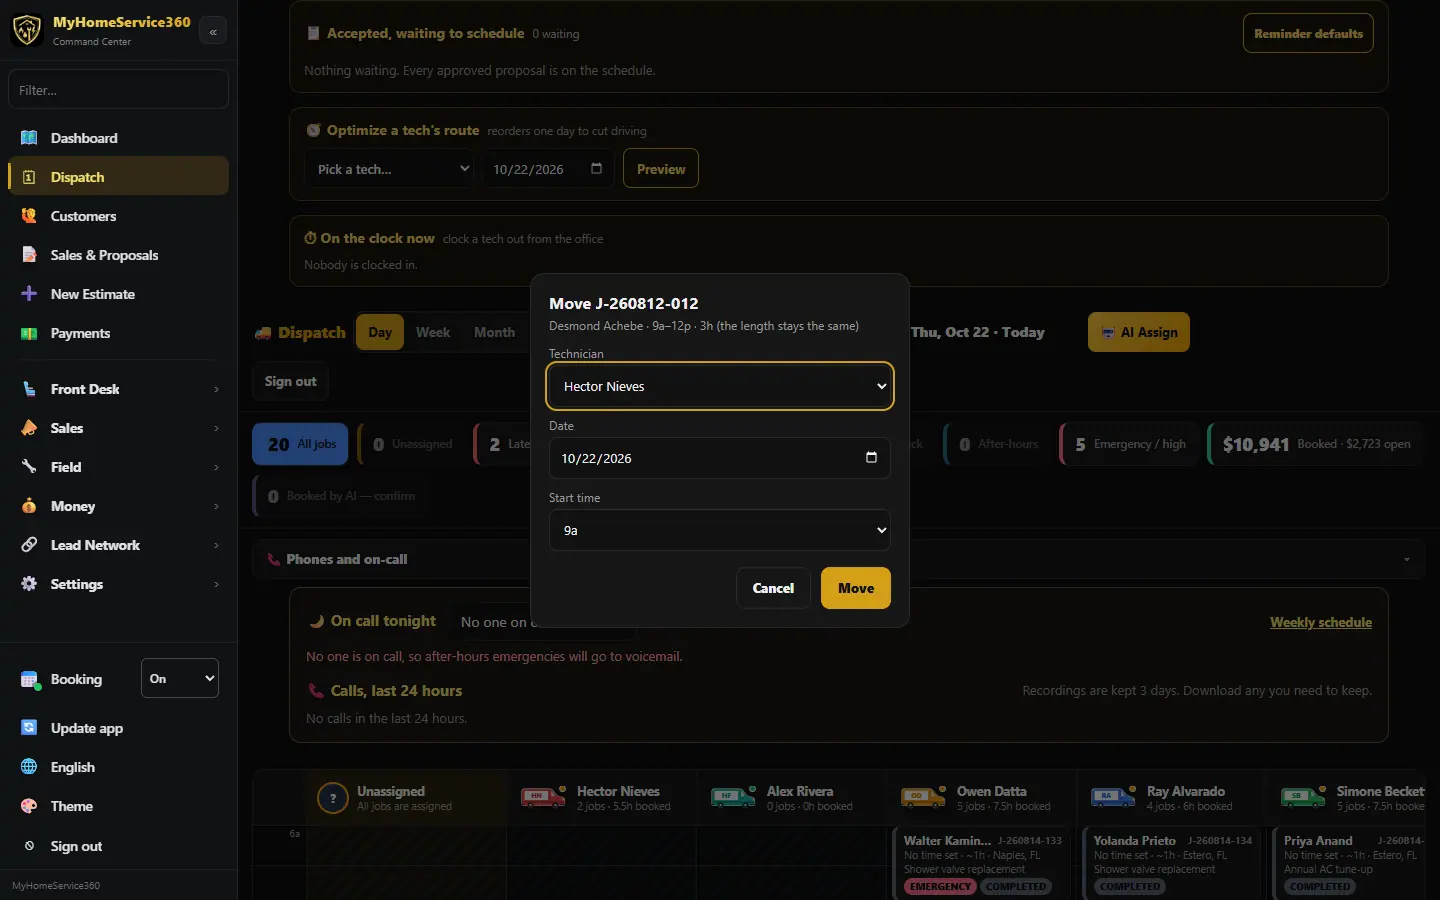
Right-click a job (or long-press it, or focus it and press M) for Move to…, Unassign and Details. Move to… asks for the tech, date and start time, and keeps the job’s length.
From the keyboard: Tab to a job, press an arrow key to pick it up, use the arrows to move it, Enter to drop it and Esc to cancel.
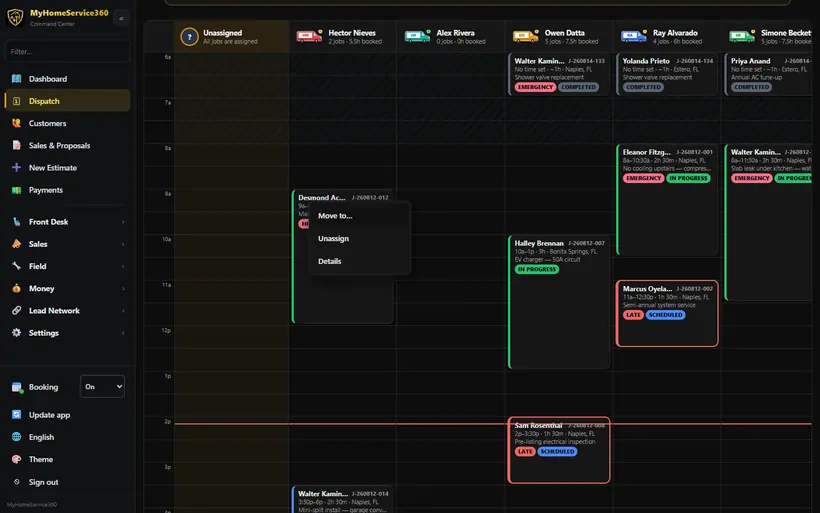
Real screen from the demo account; names and numbers are sample data. 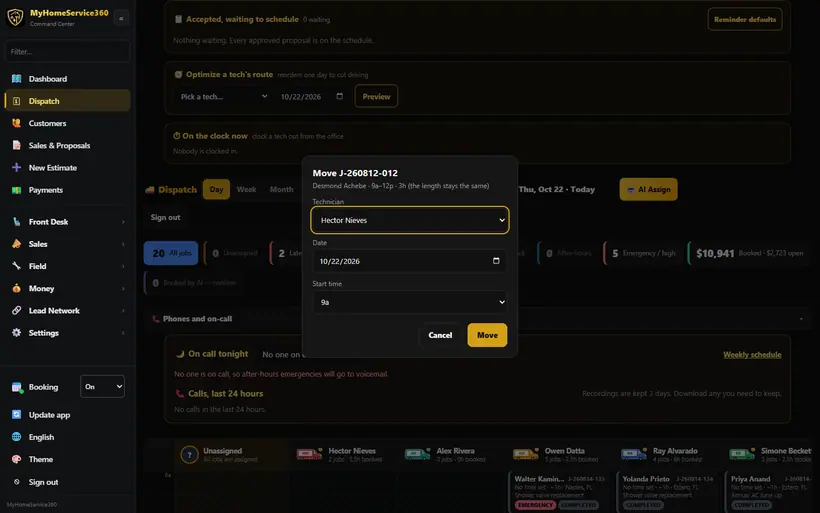
Real screen from the demo account; names and numbers are sample data. Step 8: See everything on a job without leaving the board
Click any job for its details panel. Besides the time, address, tech and status, it shows the tech’s notes (diagnosis, what they did, their notes), whether the customer signed, how many photos there are, and Charges: every line on the ticket, the invoice total, what’s been paid and how, and the balance. When a tech signs and completes the job in the field, the card turns completed on the board within about 15 seconds, and an open panel updates itself too, no reload needed.
Step 9: Pin a note for the tech
In a job’s panel, 📌 Pinned notes lets you pin a note to the top of the job in the tech app: for this job, for every job for that customer, or for every job at that address. Each note in the job’s Notes list also has a 📌 Pin button. Unpin takes it off.
Step 10: When a job turns Complete
A job turns Complete on the board when the tech presses Complete job & invoice in the tech app. Getting the customer’s signature comes first, but signing alone doesn’t complete it. The tech app now shows that Complete button as soon as the signature is saved.
Step 11: Undo, overlaps and locked jobs
After every move a note at the bottom of the screen says what changed, with Undo for about 8 seconds. Undo puts the job back exactly as it was, tech and time included.
If the new time overlaps another job for the same tech, the move still goes through and you get a Heads up naming the overlap, so you can decide. Completed, canceled and invoiced jobs can’t be moved; try and the board tells you why.
Only office roles can move jobs. Techs never see these controls.
Step 12: Tell the customer about a new time
Turn on Tell customers when their appointment time changes in Settings → Automatic Messages (it starts off, and you can edit the wording). When a job’s date or arrival time changes, from the board, the job page or the tech app, the customer gets a short note with the new time by email, and by text if you have the phone system add-on.
On the board, the Undo note has a Tell the customer box, ticked or not to match your setting, so you can decide move by move. Nothing is sent until the Undo window closes: if you undo, the customer hears nothing, and if you move a job a few times in a row they get only the final time. Changes under 15 minutes, past dates and completed jobs are skipped.
Step 13: Put more than one tech on a job
Click the job (from any column, the late list or the Unassigned column) and find Techs on this job. The first tech is the ★ lead. Pick another tech and click + Add tech, as many times as the job needs. Tap ★ on a crew member to make them the lead, or ✕ to take them off. The job shows in every crew tech’s column with a dashed 👥 Crew card, each of them gets it in their tech app, and the customer gets one on-the-way text that names the crew. See split the units between techs.
Step 14: Fill the day with AI Assign
Click AI Assign: it hands open jobs to the nearest tech who does that trade, weighing how busy each one is. Check the result before you send the day out.
Step 15: Your techs’ vans
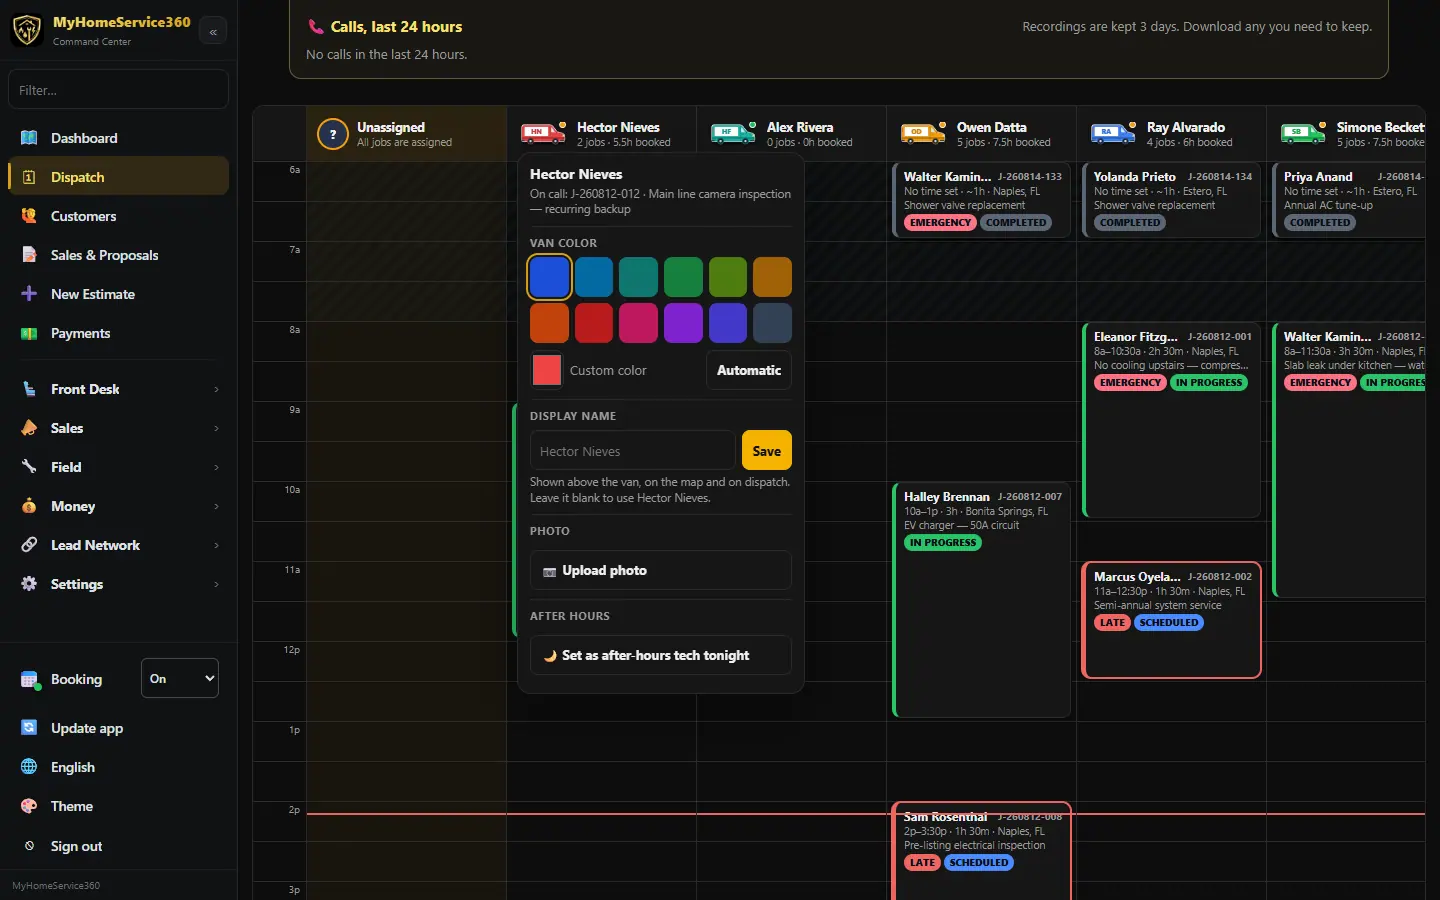
Each tech’s column starts with their van: a service van in their color with your logo on the side (or their photo), their name, what they’re doing now (for example On call, En route, Available or Off today) and an AFTER-HOURS TECH badge on tonight’s on-call tech. The same vans show on the dashboard map.
Right-click a van (or long-press it on an iPad or phone) to change the Van color, the Display name shown above the van, or the Photo; to Set as after-hours tech tonight; or, when the tech is on the clock, to Clock out. If two techs have the same color, the menu warns you so the vans don’t look alike on the map.
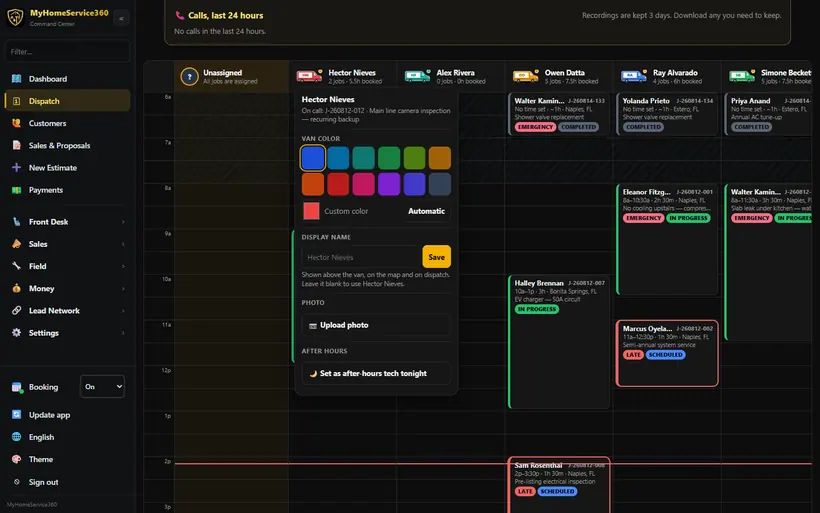
Real screen from the demo account; names and numbers are sample data. Step 16: Mark a job en route
In List view, 🚚 En route (texts customer) marks the job on the way and texts the customer, the same as the tech tapping En Route in the tech app. The job then shows 📲 Texted, or Not texted with the reason: no phone number on file, the customer replied STOP, the text is switched off, or your company doesn’t have texting yet. It sends one text per job in 30 minutes, so a second tap won’t text again.
Step 17: Clock a tech out from the office
If a tech forgot to clock out, use On the clock now on the board, the Clock out button on their column, or their van menu. Pick the clock-out time, add a reason if you like, and click Confirm clock out. The tech sees a notice in their app the next time they open it. See time tracking for the details.
Step 18: See the tech’s photos on a job
Open a job in the office app. Under Job Details, the Photos section shows every photo the tech took on the ticket, grouped Before, After and Parts, each with its caption, who took it and when. Click a photo to see it full size. The section only appears once there are photos.
Step 19: Clear late and waiting work
A red banner lists late jobs from earlier days; click Review late jobs to close or reschedule them. The Accepted, waiting to schedule panel shows approved proposals that aren’t on the calendar yet.
Step 20: Optimize a tech’s route
In Optimize a tech’s route, pick a tech and a day and click Preview. It puts their stops in the shortest order by distance and shows the miles saved. Apply it if it looks right.
Step 21: Make a job repeat
On any job, set it to repeat weekly, monthly, quarterly or yearly. The next visit lands on the board on its own.
Step 22: Set who’s on call
Open Phones and on-call on the board, or Front Desk → Calls & On-Call, to set tonight’s on-call tech or a weekly schedule. You can also right-click a tech’s van and pick Set as after-hours tech tonight. After-hours emergency calls go to them when you have the phone system add-on; see where calls go.
Still stuck? Tell us what you were trying to do and where you got stuck. A screenshot helps.
Your ticks are saved in this browser only. Updated October 2026.
Questions about this
Can customers book themselves?
Yes. Turn on online booking and customers pick a service and an open time; the job lands on your board. See the online booking guide.
Do on-my-way texts cost extra?
Day-before appointment reminders are free. On-my-way and dispatch texts use our built-in texting, which comes with the phone system add-on. Phone system + AI receptionist: $79/month* add-on, includes after-hours on-call dispatch and texting.
*Included minutes and texts cover typical use. Usage above the included amounts is billed as overage, and larger or high-volume companies may be quoted higher phone and texting rates. See our Terms.